Who should handle it? Experienced in-house maintenance staff with commercial refrigeration familiarity, or a qualified refrigeration technician. A general handyman unfamiliar with cooler door assemblies is not the right fit here.
Poor installation leads to predictable problems: warm air infiltration that drives up cooling load, a compressor that runs harder than it should, condensation and frost buildup around the frame, potential health code violations, and in some cases, voided equipment warranties under clauses excluding damage from improper installation.
Done correctly, a single-door replacement on a standard walk-in unit takes a few hours and pays for itself in reduced energy costs. This guide walks through the full process — from preparation to post-installation validation.
Key Takeaways
- Measurements, gasket seating, and hinge alignment directly determine energy efficiency and code compliance
- Inspect the frame and gasket channel first — structural damage will compromise any replacement door
- The gasket is your primary seal; confirm it seats fully before closing out the job
- Freezer door anti-sweat heater strips must be reconnected to prevent frost buildup at the jamb
- Unusual system behavior or visible frame damage after installation warrants a qualified technician
What the Replacement Process Involves
The replacement process follows four phases: removal and inspection, preparation, installation, and validation. Skipping steps in any phase — especially inspection — tends to show up as leaks, misalignment, or failed gasket seals after the door is hung.
With proper preparation, a door-only replacement on a standard walk-in unit is typically completable in a few hours. Add time if the frame needs cleaning, heater strips require reconnection, or the gasket channel is damaged.
Prerequisites and Safety Considerations
Before any work begins, confirm:
- The replacement door matches the original opening dimensions — height, width, thickness, and hinge side
- The door meets required certifications: NSF/ANSI 7 (sanitation), UL (electrical safety), and DOE 2017 energy efficiency compliance — the current standard requires a minimum of R-25 insulation for cooler doors per 10 CFR 431.306
- Any custom configurations (viewing windows, kick plates, stainless finish) are accounted for before ordering
Safety requirements:
- Power down any anti-sweat heater strips wired to the frame before removal
- Transfer or protect cooler contents if the unit will be open for extended periods
- Wear appropriate PPE, including insulated gloves in cold environments
Non-negotiable: Do not proceed if the rough frame opening shows structural rot, warping, or damage to the metal framing. These require frame repair or full frame replacement before the door can be installed.
Tools and Parts Required
Tools:
- Tape measure and level
- Power drill with appropriate bits
- Phillips and flat-head screwdrivers
- Rubber mallet and utility knife
- Torque wrench for hinge bolt tightening
Parts and materials:
- Replacement walk-in cooler door (insulated slab with correct R-value — R-25 minimum for coolers, R-32 for freezers)
- Compatible door gasket (magnetic or compression type, matched to the frame profile)
- Replacement hinge hardware if existing hinges are worn
- Sealant or foam backer rod for any frame gaps
Specialty cooler doors are not off-the-shelf items. The replacement needs to match your unit's panel thickness, insulation rating, frame type, and swing direction — getting any one of those wrong will determine whether the door seals and performs correctly. ELT Custom Coolers manufactures NSF-approved, UL Certified, DOE 2017 Compliant replacement doors to commercial specifications, with 65 in-stock cooler door SKUs spanning widths from 30" to 60" and heights from 78" to 130". Custom fabrication is also available for non-standard openings.
How to Install the Replacement Door: Step-by-Step
Installation follows a defined order across five steps. Skipping any of them — especially gasket seating and hinge alignment — is the most common cause of long-term sealing failures. Work through each step in sequence.
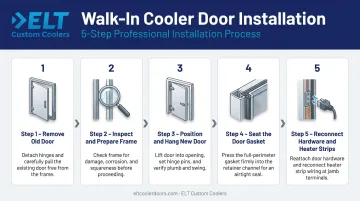
Step 1 — Remove the Old Door and Document
With a second person assisting, unscrew hinge bolts and carefully lift the old door off its hinges. Before removing anything else:
- Photograph hinge placement, gasket channel condition, and any heater strip wiring
- Note the hinge side and frame type for reference during reinstallation
- Keep this documentation accessible throughout the job
Step 2 — Inspect and Prepare the Frame
A new door installed on a compromised frame will fail at the frame, not the door.
- Clean the gasket channel of debris, old gasket material, and any ice buildup
- Check the frame perimeter for structural integrity — look for corrosion, warping, or loose fasteners
- Confirm the opening is level and plumb with a level before proceeding
- Note whether anti-sweat heater wires need to be disconnected and later reconnected (standard on freezer doors; less common on cooler doors)
Step 3 — Position and Hang the New Door
- With a helper, align the new door on the hinge side first
- Position cam-lift or heavy-duty commercial hinges at the marked locations
- Pre-drill if needed, and secure hinge bolts firmly
- Check plumb before fully tightening — a door hung out of plumb will never seal correctly
- Once plumb is confirmed, torque hinge bolts to specification
Step 4 — Seat the Door Gasket
Gasket seating determines whether your cooler holds temperature — a skipped corner or loose section will bleed cold air continuously. ELT Custom Coolers' replacement doors include a magnetic door gasket plus a double-sweep gasket as standard; both components need correct seating.
- Press the magnetic or compression gasket firmly into the gasket channel around the full door perimeter
- Pay particular attention to corners — folds or gaps at corners are the most common source of air infiltration
- Even a small unseated section causes cold air loss over time
Step 5 — Reconnect Hardware and Heater Strips
- Reinstall the door handle, latch hardware, and self-closing mechanism
- If anti-sweat heater strips are present (required on freezer door frames), reconnect wiring per the original configuration documented in Step 1
- Verify continuity with a multimeter before closing the unit — Thermo-Kool's installation documentation, for example, requires the heater circuit to be energized and checked after wiring, with warm jamb trim confirming operation
Post-Installation Checks and Validation
Validating the installation before returning the cooler to full operation is not optional. Problems discovered after the unit has been restocked are harder to address and more disruptive.
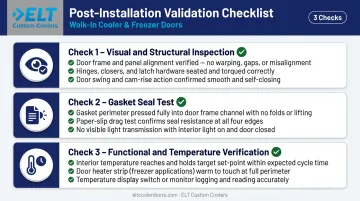
Run through three checks before restocking: a visual inspection, a seal test, and a temperature verification.
Visual and structural check:
- Door hangs flush with the frame
- Gasket makes full contact on all four sides with no visible gaps
- Hinge hardware is fully tightened with no play
Seal test:
- Paper method: Slip a sheet of paper between the door and frame at several points around the perimeter and close the door. It should take firm resistance to pull out.
- Light method (more reliable): Stand inside the closed cooler and look for any visible light around the perimeter. Any light indicates a gap that needs correction.
Functional and temperature check:
- Open and close the door several times to confirm smooth operation and self-closure
- Monitor internal temperature over the next 1–2 hours — the unit should return to set temperature without the compressor running continuously
- According to NREL research, warm air infiltration accounts for more than 50% of walk-in cooling load during door-opening events — a failed seal adds that load back from the first use
Common Installation Problems and Fixes
Most issues appear within the first few hours of operation. Catching them immediately is far easier than addressing them after the cooler has been restocked.
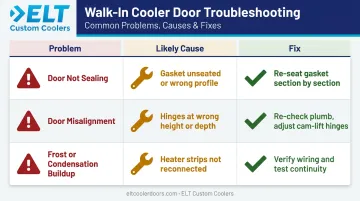
Door Not Sealing — Warm Air Infiltration
Signs: Temperature inside the cooler rises gradually; condensation visible around door edges
Likely cause: Gasket not fully seated in channel, corners not tucked in, or the wrong gasket profile was used for the frame type
Fix: Remove and re-seat the gasket section by section, focusing on corners. If the gasket profile doesn't match the frame, order the correct replacement before proceeding — a mismatched profile cannot be forced into a seal.
Door Misalignment — Won't Close Flush or Binds
Signs: Door drags on the frame, doesn't close fully, or leaves uneven gaps along one side
Likely cause: Hinges not mounted at correct height or depth, door panel not plumb, or cam-lift hinge adjustment needed
Fix:
- Loosen hinge bolts and re-check plumb with a level
- Adjust cam-lift hinge height if the mechanism allows it
- Shim behind hinges if the frame surface is uneven
Condensation or Frost Buildup Around the Frame
Signs: Frost or heavy moisture accumulates around the door frame shortly after installation
Likely cause: Anti-sweat heater strips weren't reconnected, were wired incorrectly, or the heater circuit has a fault. This is primarily a concern on freezer doors — standard cooler doors typically do not require heater strips.
Fix: Verify heater strip wiring connections against the original documentation. Use a multimeter to check continuity in the heater circuit. Replace damaged strips before closing up the installation.
Pro Tips for Walk-In Cooler Door Installation
Schedule during off-peak hours. In food service environments, coordinate with kitchen staff to relocate perishables if the cooler will be open longer than 30 minutes.
Document before you disconnect. Before removing the old door, photograph hinge placement, gasket channel depth, and heater strip routing. These reference photos are especially useful if the replacement door has any dimensional differences from the original.
Measure the rough opening, not the old door. ELT Custom Coolers' catalog distinguishes between door size and rough opening size — a 36"×78" plug frame door, for example, requires a 33.5"×78" rough opening. Ordering by door size alone leads to a misfit.
Know when to ask. For non-standard configurations, frame damage questions, or health code compliance concerns, ELT Custom Coolers carries 65+ in-stock cooler door SKUs and manufactures custom sizes in-house — their team can match replacement doors to non-standard or retrofit openings. Contact them at eltcoolerdoors.com.
Conclusion
Walk-in cooler door installation quality directly determines energy efficiency, temperature stability, and compliance with FDA Food Code requirements, which mandate that doors, seals, hinges, and fasteners stay intact and adjusted to manufacturer specifications. A correctly installed door with a proper gasket seal and functioning heater strips (where required) keeps the compressor from overworking — protecting equipment life and keeping energy bills in check.
Take the time to prepare properly, validate the installation before restocking, and don't skip the seal test. For non-standard openings, frame damage, or any configuration that falls outside a straightforward swap, bring in a qualified specialist and make sure the replacement door is spec'd correctly for the opening before work begins. A mismatched door on a non-standard frame is one of the most common reasons a "simple" swap turns into a multi-day repair.
Frequently Asked Questions
What is the average cost to install a replacement walk-in cooler door?
Door costs vary based on size, frame type, insulation rating, and finish. ELT Custom Coolers' in-stock cooler doors range from approximately $1,250 to $6,500 for standard swing configurations. Professional installation labor adds to this figure and varies by region and job complexity.
Can I install a replacement door without replacing the frame?
Yes, if the existing frame is structurally sound, level, and the gasket channel is intact, only the door slab and gasket need replacement. A compromised frame must be addressed first — a new door cannot compensate for a damaged or warped opening.
How do I know if my walk-in cooler door needs to be replaced?
Key indicators include visible gasket damage or gaps, the door not closing flush, frost or condensation buildup around the frame, rising energy bills, or the compressor running more frequently than normal. Any of these warrants a prompt inspection.
What type of door is best for a walk-in cooler?
Commercial walk-in cooler doors should have a polyurethane foam core (minimum R-25 per DOE standards), a magnetic or compression gasket, and meet NSF/ANSI 7, UL, and DOE 2017 energy efficiency requirements for food service applications.
How long does it take to replace a walk-in cooler door?
A straightforward door-only replacement typically takes 2–4 hours with two people. Frame repairs, heater strip reconnection, or gasket channel cleaning can extend that timeline.
Do walk-in cooler replacement doors need to be NSF approved?
Yes. The FDA Food Code requires NSF-certified equipment in food service environments to meet health department sanitation standards. When sourcing a replacement door, also verify UL certification (electrical safety) and DOE 2017 compliance (energy efficiency).