The good news is that hinge misalignment is usually a straightforward mechanical fix. This guide covers the warning signs, required tools, a step-by-step adjustment process, common mistakes, and the point at which adjustment stops being the right answer.
Key Takeaways
- Visible door sag, uneven gaps, frost buildup, and temperature swings all point to hinge misalignment
- Three tools cover the job: a flathead screwdriver, a ratchet/hex driver, and a crescent wrench
- Loosen lag screws; never fully remove them during adjustment
- Always open the door and break the magnetic seal before turning the center adjustment screw
- Cracked hinges, warped panels, or stripped mounting holes require replacement — not adjustment
Signs Your Walk-In Cooler Door Hinges Need Adjustment
Four Symptoms to Watch For
1. Door sag or uneven frame gap One side of the door sits wider than the other. Check the top and bottom corners on the latch side — that's where hinge-driven sag shows up first.
2. Frost or ice at the door frame When the door doesn't seat flush, warm air infiltrates and freezes at the edges. Ice concentrated along one side of the frame points to a gap, not a failing gasket.
3. Drag or extra force to open and latch A sagging door catches on the frame or threshold. If you're yanking the door to get it to latch, the door position has shifted — not the latch itself.
4. Rising internal temps without a refrigeration cause A door gap makes the compressor run longer to compensate for cold air loss. If temperatures are creeping up and the refrigeration system checks out, the door seal is the next place to look.
Hinge vs. Gasket: How to Tell the Difference
Misdiagnosing this as a gasket problem wastes a service call. Here's how to separate the two quickly:
- Uneven gap along one side → hinge misalignment
- Uniform gap around the entire perimeter → gasket compression failure
- Door sag visible by eye → hinge, not gasket
A quick monthly check takes under two minutes: stand back and look at whether the door edge runs parallel to the frame, then open and close it to feel for drag. Catching this early keeps your compressor from overworking — and keeps you clear of temperature-log violations during health inspections.
Tools and Safety Checklist Before You Start
Tools Required
| Tool | Purpose |
|---|---|
| Flathead screwdriver | Prying off the hinge cover |
| Ratchet or hex/socket driver | Loosening and tightening lag screws |
| Crescent wrench | Turning the center adjustment screw only |
| Rubber mallet (optional) | Freeing a stiff hinge cover without cracking it |
You don't need power tools. Using the wrong driver size on lag screws risks stripping them — match the driver to the screw head before applying any force.
Safety Checks Before Starting
- Disconnect door heater power if the door has an anti-condensate heater wire. Per OSHA 1910.333, live electrical components must be de-energized before working near them.
- Wear protective gloves. Hinge hardware has sharp metal edges.
- Prop the door open so it can't swing closed mid-adjustment. In commercial kitchens, schedule this during off-hours to avoid a door swinging into staff.
- Work with a second person if possible, particularly in walk-in freezers where working alone creates a safety risk.
Identify Your Hinge Type First
Once the door is safely propped, identify your hinge type before touching any fasteners — the adjustment procedure differs between the two most common types on commercial walk-in doors:
- Cam-rise adjustable hinges: Have a visible center adjustment screw on the barrel. Common on standard and plug-frame walk-in doors.
- Spring-assisted hinges: Include an internal spring that adds closing force to overcome air pressure on heavy doors. The adjustment screw location may sit higher or lower on the barrel depending on the manufacturer.
Check the hinge manufacturer's label or the unit's documentation before proceeding — the adjustment screw location and turn direction vary by type.
How to Adjust Walk-In Cooler Door Hinges Step by Step
Step 1: Remove the Hinge Cover
Locate the hinge cover — typically a black rubber or metal piece with a ribbed or barbed edge. Insert a flathead screwdriver at the outer edge and pry gently. Don't force it from the wrong side; covers crack easily if you start from the face rather than the edge.
Step 2: Loosen the Lag (Mounting) Screws
Using your ratchet or hex driver, loosen all lag screws on the hinge — typically four per hinge. Loosen them just enough that the door can shift position. Do not fully remove them. A fully removed lag screw lets the hinge plate shift unpredictably and makes repositioning far harder. Before loosening, mark the original screw positions with a marker so you have a reference point.
Step 3: Open the Door and Break the Magnetic Seal
Before touching the adjustment screw, fully open the door so the magnetic gasket is completely disengaged. If you adjust while the gasket is still compressed against the frame, the door will spring back to its compressed position once released — making the alignment look correct when it isn't.
Step 4: Turn the Center Adjustment Screw
This screw controls the door's lateral position:
- Clockwise → pulls the door toward the hinge side (corrects a gap on the hinge side or a door swinging outward)
- Counterclockwise → pushes the door away from the hinge side (corrects over-compression on the hinge side)
For a two-hinge door with visible sag, the top and bottom hinges are adjusted in opposite directions. Per Kason's official 1345 hinge instructions, the correction for a right-hand door sag is clockwise on the top hinge and counterclockwise on the bottom.
Make no more than a quarter turn at a time, then step back and check door parallelism before continuing. Aggressive multi-rotation adjustments are one of the most common causes of overcorrection.

Step 5: Tighten Screws and Replace the Cover
Once the door edge sits parallel to the frame with an even gap on all sides, retighten the lag screws firmly. Don't overtighten — excessive torque strips the screw holes in the door panel foam core, which is far harder to repair. Replace the hinge cover by pressing it back in from the opposite side to how you removed it.
Step 6: Test the Door Seal
With the adjustment complete, close the door fully and inspect the gasket compression around the entire perimeter. Then perform the dollar-bill drag test: slide a dollar bill between the gasket and frame at multiple points around the door. Per ENERGY STAR's commercial building guidance, if the bill slides out without resistance, the seal is insufficient.
If the seal still fails after a successful hinge adjustment, the gasket itself — not the hinge — may need attention.
Common Mistakes and Troubleshooting
Mistakes That Lead to Repeat Service Calls
- Fully removing lag screws instead of loosening them — causes the hinge plate to shift unpredictably and is the single most disruptive mistake in the process
- Adjusting with the gasket still engaged — masks the true door position; the door will appear aligned until the gasket seal releases
- Turning the adjustment screw more than a quarter turn at a time — overcorrects and creates new misalignment in the opposite direction
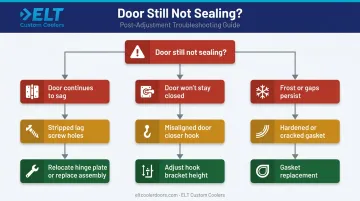
If you've avoided those mistakes and the door still isn't right, one of these three scenarios is likely responsible.
Door Continues to Sag After Adjustment
The lag screw holes in the panel have probably enlarged from repeated adjustments or heavy use — the screws no longer grip firmly enough to hold the hinge plate in position.
Inspect each hole for stripping. If the screws spin without biting, relocate the hinge plate slightly to fresh material, or replace the hinge assembly entirely.
Door Won't Stay Closed After Hinge Adjustment
The door closer — the hook-and-roller mechanism at the top of the door — is misaligned. Hinge adjustment corrects door position; it does not affect closing force.
Watch whether the roller clears the hook's outer lip as the door closes. If it doesn't, loosen the hook bracket screws on the door panel, adjust the hook height, and retighten. This is a separate adjustment from the hinge.
Frost or Gaps Persist After Successful Hinge Adjustment
The gasket has likely hardened, cracked, or taken a permanent set and no longer compresses properly — even with the door correctly aligned.
Inspect the gasket for visible cracking, stiffness, or deformation along its length. A gasket that has lost flexibility will fail the dollar-bill test regardless of hinge position and needs replacement before you conclude the door is still the problem.
When to Replace Instead of Adjust
Hinge adjustment has a clear boundary. Once you're past it, more adjustments won't hold.
Signs the Hinge Itself Has Failed
Stop adjusting and replace the hinge when you see:
- Metal fatigue cracks near the pivot point or cam mechanism
- Rust that has penetrated the hinge body (surface discoloration is different from structural corrosion)
- A center adjustment screw that spins freely without producing any door movement — the cam mechanism inside has failed
Signs the Door Panel Can't Support Adjustment
If the door panel itself is warped, dented near the hinge mounting area, or shows soft spots indicating foam core compromise, no hinge adjustment will hold. The structural integrity of the panel determines whether screws can grip at all. A warped panel needs door replacement, not a repositioned hinge.
When Replacement Is the Practical Decision
For commercial operations where hinge failures keep recurring on an aging door, the math on service calls typically favors replacement over repeated repairs.
ELT Custom Coolers manufactures NSF-approved, UL Certified replacement doors in prehung configurations. Options include:
- Standard sizes from 36" wide, with in-house custom manufacturing for non-standard openings
- Cam-lift or spring-assisted hinges matched to the traffic demands of the installation
- Cooler and freezer configurations with standard, plug, or heated-jamb frames

For kitchens dealing with persistent door issues, a full door replacement eliminates the root cause rather than deferring it.
Frequently Asked Questions
How do I know if my walk-in cooler door hinges need adjustment?
Look for visible door sag, an uneven gap between the door edge and frame (wider on one side), frost accumulation at the door edges, or increased resistance when opening and closing. If the gap is uneven along one side specifically, the hinge is the likely culprit rather than the gasket.
What tools do I need to adjust walk-in cooler door hinges?
You need three tools: a flathead screwdriver to remove the hinge cover, a ratchet or hex driver (matched to your lag screw size) to loosen the mounting screws, and a crescent wrench for the center adjustment screw. No power tools are required or recommended.
How often should walk-in cooler door hinges be inspected?
Do a quick visual check monthly. Look for parallel alignment between the door edge and frame and confirm the door swings freely without drag. Run a more thorough inspection any time you notice frost buildup at the door edges or unexplained temperature inconsistencies inside the cooler.
Can I adjust walk-in cooler door hinges myself, or do I need a certified technician?
A knowledgeable operator can handle basic hinge adjustment with the right tools. The FDA Food Code requires hinges to be maintained per manufacturer specs, not that a licensed technician perform every adjustment — but check your warranty terms before proceeding. Any electrical work near door heater wires requires a qualified electrician.
What is the difference between adjusting walk-in cooler door hinges and door closers?
Hinges control the door's positional alignment: they fix sag and prevent gaps. The door closer is the separate hook-and-roller mechanism at the top that pulls the door shut. Both can fall out of adjustment independently, so fixing the hinge will not automatically correct a misaligned closer.