Gasket wear is among the most common overlooked maintenance issues in both residential and commercial refrigeration. It rarely fails overnight — it degrades gradually, which is why many operators don't catch it until energy bills spike or a health inspector flags it.
This guide covers how to spot a failing gasket, the exact steps to replace one, common mistakes to avoid, and when replacing the gasket alone is no longer the right fix.
Key Takeaways
- Worn door gaskets drive up energy bills, cause temperature swings, frost buildup, and accelerate food spoilage
- Most gasket replacements take under an hour and require only basic tools, making it one of the more straightforward refrigeration maintenance tasks
- Always soak the new gasket in warm water before installation and start fitting from the corners
- On commercial walk-in units, recurring gasket failures are a strong indicator that full door replacement is the more cost-effective fix
Signs Your Refrigerator Door Gasket Is Failing
What to Look For
Gasket problems are easy to spot once you know what to check. Common warning signs include:
- Visible cracks, tears, or brittleness in the rubber along any part of the perimeter
- Mold or mildew forming along the seal — a sign moisture is getting trapped
- Condensation around the door edges, especially on the exterior frame
- Excessive frost buildup inside the unit despite normal usage
- The compressor running more frequently than usual
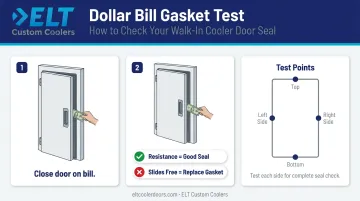
The quickest diagnostic is the dollar bill test, recommended by the U.S. Department of Energy: close the door on a dollar bill, then pull it out. If it slides free with no resistance, the seal is compromised. Run this test at several points around the door — top, sides, and bottom.
Why Gaskets Fail
Spotting the symptoms early is only half the picture. Understanding what drives gasket failure helps commercial operators prevent repeat replacements:
- Natural rubber degradation from age and temperature cycling
- High door-open frequency — a major factor in commercial settings
- Door slamming or catching items in the door
- Grease and grime buildup that hardens the seal over time
- Moisture infiltration that causes warping or mold growth
According to KaTom, commercial refrigerator door gaskets can last anywhere from six months to several years depending on usage and maintenance habits. Traulsen's service manual recommends inspecting gaskets every three months in commercial environments — Parts Town goes further, advising weekly checks for dart-style commercial gaskets.
For commercial operators, the cost of ignoring a failing seal compounds fast. Compressor overwork shortens equipment life, temperature inconsistency triggers food safety compliance failures, and excess condensation damages surrounding surfaces and flooring.
How to Replace a Refrigerator Door Gasket: Step-by-Step
Done in the right order, this repair is straightforward. Patience during installation — especially at the corners — determines whether the new gasket seals correctly or develops gaps that allow cold air to escape and drive up energy costs.
Tools and Materials You'll Need
- Correct replacement gasket (matched to your refrigerator's make, model, and door type)
- Nut driver or hex-head screwdriver (for screw-retained gaskets)
- Putty knife
- Petroleum jelly
- Bucket of warm water
- Clean cloth
A note on gasket types: Attachment styles vary by model. The three main types are press-in/snap-in (dart), screw-retained, and foamed-in-place (found on some commercial and residential models). Identify yours before purchasing a replacement. The correct attachment style matters as much as the dimensions.
Step 1: Prepare the New Gasket
Soak the new gasket in warm (not boiling) water for 5–10 minutes before installation. This makes it flexible, removes shipping kinks, and ensures a proper fit. Skipping this step is one of the most common reasons a new gasket leaks.
If using a heat gun or hair dryer as an alternative, keep it moving — concentrated heat permanently deforms the rubber.
Step 2: Remove the Old Gasket
Unplug the refrigerator first. Then:
- Press-in gaskets: Start at one corner and pull the gasket out of the channel at a 45-degree angle to avoid door damage.
- Screw-retained gaskets: Lift the inner flange to expose the retainer screws, loosen (but don't remove) them, then pull the gasket off.
For badly deteriorated seals, cutting the old gasket at the midpoint of one long edge first can make removal easier.
Step 3: Clean the Door Channel
Before installing the new gasket, wipe the track clean with a damp cloth. Remove all residue, old adhesive, grease, and mold. Warm water with mild dish soap handles grease and food particles effectively.
Any debris left in the channel will prevent a tight fit and create gaps in the new seal.
Step 4: Install the New Gasket
- Start at one top corner and work the gasket lip into the track.
- Move down both sides and across the bottom — don't rush the corners.
- Use the opposite-corner technique: set one top corner, then seat the diagonally opposite bottom corner to keep tension even across the perimeter.
- For screw-retained types, snug the retainer screws without fully tightening until the entire gasket is seated.
- Apply a thin layer of petroleum jelly along the hinge side only to reduce drag and help the seal conform. Limit this to the hinge side; applying it around the full perimeter can actually reduce sealing contact.
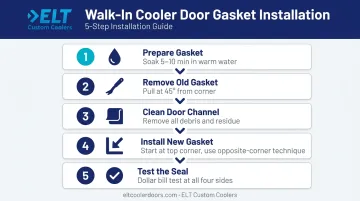
Step 5: Test the Seal and Finalize
- Close the door and inspect for visible gaps or uneven contact around the full perimeter
- Repeat the dollar bill test at multiple points — top, both sides, bottom
- Check door alignment: if the door looks warped, grip opposite corners and apply gentle opposing pressure before retightening the screws
- Plug in the refrigerator and monitor for stable temperature recovery and absence of new condensation over the next 24 hours
Common Mistakes to Avoid When Replacing a Door Gasket
Most gasket replacements that fail come down to one of three avoidable errors. Getting these right the first time saves a second service call.
Wrong gasket ordered. Gasket dimensions and attachment styles vary by manufacturer, model, and even production run. Always pull the unit's data plate — make, model, and serial number — before ordering. An incompatible gasket is the single most common reason a newly replaced gasket still leaks.
Skipping the warm water soak. Installing a cold, stiff gasket creates permanent creases that leave air gaps along the door perimeter. Forcing a rigid gasket into corners is also a leading cause of tearing during installation.
Tightening retainer screws too early. On screw-retained models, tightening before the full perimeter is seated pulls the gasket out of position on the opposite side. Seat the entire perimeter first — then go back and tighten.
When to Repair the Gasket vs. Replace the Door
When a Gasket Replacement Is Enough
A gasket-only repair makes sense when:
- The door itself is structurally sound — no warping, bowing, or frame damage
- The unit is relatively new and in otherwise good condition
- The failure is isolated to the seal
Cost reference: Residential replacement gaskets range from around $36 to $180 depending on the model (verified OEM examples from RepairClinic and Parts Town). Commercial and walk-in gaskets run from approximately $89 to $299 for models like True and Traulsen units. Professional installation adds a diagnostic fee — Sears Home Services lists a typical range of $100–$150, waived if the repair proceeds.
When the Door Needs Replacing
According to Polar King's repair-versus-replacement guidance, a full door replacement is warranted when:
- The door panel shows visible warping, bowing, or structural damage that prevents proper closure
- Gasket failures keep recurring in a short period — a sign of poor door alignment or frame damage
- The door frame or hinges are physically damaged
- Chronic condensation or ice buildup persists despite multiple repairs
- The door is difficult or unsafe to operate
For commercial operators managing walk-in coolers, freezers, or high-frequency refrigeration units, repeated gasket failures are rarely a coincidence. When the underlying door structure is compromised, a full door replacement is the only lasting fix.

ELT Custom Coolers manufactures UL-certified, NSF-approved walk-in cooler and freezer replacement doors, prehung with magnetic door gaskets and double-sweep gaskets included as standard. Their catalog covers standard sizes from 30"×78" up to large-format sliding doors, with custom manufacturing available for non-standard openings — built for food service and retail environments where sealing reliability affects both compliance and operating costs.
Preventive Tips to Extend Refrigerator Door Gasket Life
Most commercial walk-in gasket failures are preventable. The right cleaning routine and daily handling habits can double a gasket's service life and keep it passing health inspections.
Cleaning
Wipe gaskets down with mild soap and warm water at least monthly — more often in commercial kitchens. Traulsen's service manual specifies a baking soda solution (1 tablespoon per pint of water) as an effective cleaner that won't damage the rubber. Avoid harsh chemicals, alkaline cleaners, and abrasive pads — these dry out and crack the seal faster.
Daily Handling Habits
Small operational changes reduce wear significantly:
- Avoid door slamming and forceful closures
- Don't leave walk-in doors ajar in busy service periods
- Keep shelves near the door clear of overloading — items pressing against the gasket cause it to deform over time
- Use only the door handle to open and close (per Hoshizaki's commercial manual)
Routine Inspections
Schedule a visual gasket check as part of regular walk-in maintenance. In commercial operations, monthly seal checks plus the dollar bill test give a reliable pass/fail read on gasket condition. Catching deterioration early avoids emergency replacements and food safety incidents. A failed gasket during a health inspection is a far more expensive problem than a $100 replacement.
Frequently Asked Questions
How much does it cost to replace a fridge door gasket?
Commercial and walk-in cooler gaskets run roughly $89–$299 for OEM parts. Residential refrigerator gaskets typically cost $36–$180 depending on brand and model. Professional installation adds a service call fee — expect $100–$150 for the diagnostic visit, plus repair costs confirmed on-site.
Is it worth replacing a fridge door gasket?
Yes. A new gasket cuts energy waste, prevents food spoilage, and costs far less than compressor repairs or a full refrigerator replacement that prolonged seal failure can trigger.
What are signs of a bad fridge gasket?
Key signs include visible cracks or tears in the rubber, mold or condensation along the door edge, frost buildup inside the unit, and the compressor running more frequently than normal. The dollar bill test provides a quick seal check.
Are fridge gaskets universal?
No. Gaskets are model-specific in both size and attachment style. Always identify your refrigerator's make, model number, and door type before purchasing — and for commercial units, include the serial number since gasket specs can vary by manufacturing date.
How long does a refrigerator door gasket last?
Residential gasket lifespan varies and no single authoritative benchmark exists. For commercial refrigerators, KaTom notes gaskets can last anywhere from six months to several years depending on usage frequency, cleaning habits, and physical wear. High-traffic commercial environments wear gaskets significantly faster than residential use.
Can I replace a refrigerator door gasket myself?
Yes — for most residential and commercial reach-in refrigerators, gasket replacement is a beginner-level DIY repair requiring basic tools and under an hour. Call a professional for commercial units with foamed-in-place gaskets or when the door has structural issues that need assessment alongside the seal replacement.