Building a walk-in cooler door is achievable if you have intermediate construction skills and access to the right commercial-grade components. The results vary significantly based on insulation thickness, sealing precision, and hardware selection. Get any of those wrong, and the door will underperform regardless of how well the rest of the build came together.
This guide covers exactly what materials you need, the step-by-step construction process, the performance variables that matter most, and an honest look at when buying a pre-manufactured door is the smarter call.
Key Takeaways
- DOE regulations require at least R-25 door insulation for walk-in coolers and R-32 for freezers
- Standard commercial cooler doors run 34–36" wide by 78" tall — measure your actual opening before building
- Cam-lift hinges are non-negotiable — residential hinges cause gasket misalignment within months
- An interior safety release handle is a safety-critical requirement, not optional hardware
- In regulated food service environments, a factory-certified door is the safer, code-compliant choice
What You Need Before Building a Walk-In Cooler Door
Having all materials staged before you start prevents the mid-build compromises that hurt door performance most — cutting foam slightly short because you ran out, or skipping a sealant pass because the store is closed.
Materials and Components
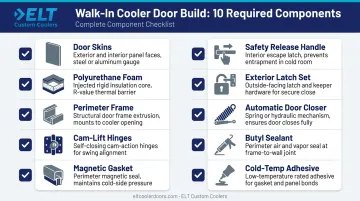
Here's what you need for a complete build:
- Door skins — 26-gauge galvanized or stainless steel, inner and outer faces
- Rigid polyurethane foam insulation — minimum 4" thickness for coolers; confirm the product's certified R-value meets R-25 before purchasing (polyurethane can reach up to R-8 per inch, but product R-values vary — get the manufacturer data sheet)
- **Steel or aluminum perimeter frame** — cut to door dimensions, depth matched to insulation thickness
- Commercial cam-lift hinges — at minimum two heavy-duty units; three for full-height personnel doors
- Magnetic vinyl door gasket — full-perimeter, mitered corners
- Interior safety release handle — mandatory before the door goes into service
- Exterior latch and handle set
- Automatic door closer — DOE requires automatic closers on eligible walk-in doors (up to 3'9" wide and 7' tall)
- Butyl sealant and spray foam — for perimeter voids and panel seams
- Cold-temperature adhesive — rated for refrigerated environments
Skill, Safety, and Compliance Readiness
Metal cutting and precise foam fitting require intermediate skill. Before materials arrive, confirm these two things:
- Jurisdiction check — food service operations subject to health department inspections may need a commercially certified door. A field-built door carries no NSF or UL listing, which can fail a health department inspection.
- Electrical components — if your freezer application requires door heater strips, hire a licensed electrician for that work.
How to Build a Walk-In Cooler Door
Step 1: Measure the Rough Opening and Plan Door Dimensions
Measure the cooler frame's rough opening at multiple points — top, middle, and bottom for width; left, center, and right for height. Use the smallest measurement. The door panel is built slightly smaller than the rough opening to allow for frame depth and gasket compression; you are not building to the exact opening dimension.
Insulation requirement: DOE mandates at least R-25 for cooler doors and R-32 for freezer doors under 10 CFR 431.306. A 4" polyurethane panel can meet R-25 — but verify via the manufacturer's data sheet, not nominal thickness alone. Freezer applications requiring R-32 may need 4–5" depending on the foam product.
Step 2: Construct the Door Frame
Cut the steel or aluminum perimeter frame to your planned dimensions. Check all four corners with a framing square — any deviation here cascades into gasket alignment problems later.
Frame depth must match insulation thickness exactly — if the foam is 4" thick, the frame is 4" deep. Both inner and outer skins need to sit flush with the frame edges; even a small mismatch creates a gap that breaks the gasket seal.
Before moving to the core, confirm:
- All four corners are square (framing square check)
- Frame depth equals foam thickness at every side
- No twist or bow across the frame face
Step 3: Install the Insulated Core
With the frame squared and confirmed, fill the cavity completely with rigid polyurethane foam panels. Cut panels to fit tight — no gaps at edges or corners. Use spray foam to seal any voids along the perimeter and between panel seams.
Once the core is seated:
- Bond the exterior metal skin to the outer face of the assembly
- Bond the interior metal skin to the inner face
- Confirm both skins are fully flat — air pockets between foam and metal reduce the effective R-value and create condensation points
Use adhesive rated for cold-temperature environments. Standard construction adhesives can fail at cooler temperatures.
Step 4: Install Hardware — Hinges, Latch, and Safety Release
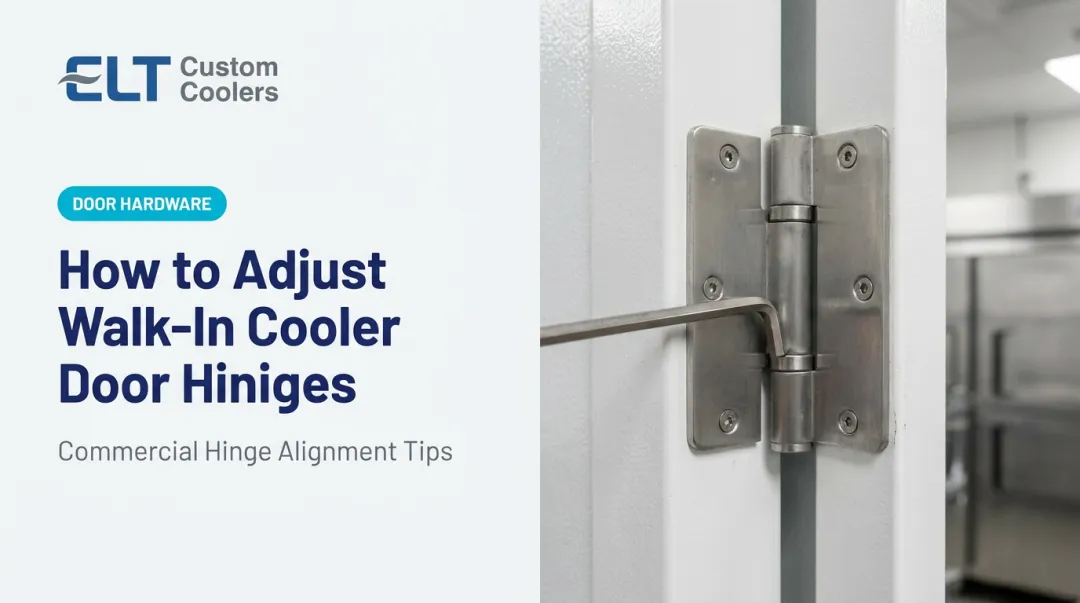
With the door panel complete, mount cam-lift hinges on the hinge-side of the door. For a standard 36" x 78" personnel door, three hinges is common commercial practice. Cam-lift hinges self-close and lift the door slightly during opening to reduce gasket drag — neither function is available with residential hinges.
Hardware installation checklist:
- Cam-lift hinges at correct positions (verify manufacturer's hinge selector for your door weight)
- Interior safety release handle — install before the door is ever put into service
- Exterior latch and handle set
- Automatic door closer at the top of the door
Step 5: Apply the Door Gasket and Hang the Door
Press the magnetic vinyl gasket into the channel around the full perimeter. Miter the corners cleanly — a gap at any corner will leak continuously regardless of how well the rest of the gasket seats.
To hang and verify:
- Mount hinge plates to the frame and hang the door
- Check plumb and level
- Close the door and run a light-gap test: shine a flashlight inside the closed cooler in a dark room and look for light escaping at the edges
- Run a paper-pull test: close the door on a sheet of paper around the full perimeter — it should hold snugly with noticeable resistance at every point
- Adjust hinge plates until the gasket compresses evenly and both tests pass

Do not commission the cooler until both tests confirm a full seal.
Key Parameters That Affect Walk-In Cooler Door Performance
Once built, a few variables govern the door's long-term performance. Getting any of them wrong means ongoing energy waste or temperature failure.
Insulation R-Value and Thickness
The door's R-value determines how much heat transfers through it per unit time. Insufficient insulation forces the refrigeration system to compensate continuously, raising energy costs and risking temperature compliance failures.
The DOE prescriptive minimums are clear: R-25 for cooler doors, R-32 for freezer doors. These are material-performance requirements, not thickness requirements.
A 4" panel of high-performance polyurethane foam (which can reach R-8+ per inch per KPS Global's published data) may meet R-32; a 4" panel of lower-grade foam may not. Always verify the certified R-value from the product data sheet before cutting to size.
Gasket Integrity and Compression
The magnetic gasket is the primary barrier against warm, humid air infiltration. A cracked, poorly fitted, or improperly compressed gasket allows infiltration that the cooling system cannot fully overcome — DOE treats infiltration control as a regulated design issue, not just a best practice.
Gasket compression should be even around the full perimeter. Inspect gaskets at least monthly and replace at the first sign of any of the following:
- Cracking or brittleness along the gasket body
- Flattening where the gasket no longer springs back
- Visible gaps at corners or along the perimeter
- Failed paper-pull test (paper slides free without resistance)
Hinge Type, Alignment, and Weight Rating
Cam-lift hinges do more than hang the door. They handle three functions standard hinges cannot:
- Returns to closed position automatically — a DOE requirement for eligible doors
- Rises slightly when opened, keeping the gasket aligned and reducing drag over time
- Carries the full panel weight — a 4" insulated commercial door is often 3–4× heavier than a standard interior door; residential hinges will cause sag and misalignment within months
Use the hinge manufacturer's selector tool (Kason publishes one in their walk-in catalog) to confirm the correct hinge model for your door's height, width, weight, and offset — don't rely on field estimates.
Interior and Exterior Skin Material
Skin material affects durability, moisture resistance, and health department compliance. The FDA Food Code requires food-contact surfaces to be safe, durable, corrosion-resistant, nonabsorbent, smooth, and easily cleanable — stainless steel meets every criterion, making it the lower-risk choice in food service environments.
For commercial applications, stainless steel interior skins are preferred for cleanability and corrosion resistance. Galvanized or coated steel may be acceptable in some jurisdictions when it remains smooth and cleanable, but confirm with your local authority having jurisdiction before specifying it.
Common Mistakes When Building a Walk-In Cooler Door
These four errors account for most DIY door failures:
- Choosing foam by thickness alone, without verifying the certified R-value, is one of the most common oversights. A door that falls short of the R-25 minimum creates chronic temperature problems the refrigeration system cannot compensate for.
- No interior safety release is both a safety hazard and a code violation — OSHA has cited employers under the General Duty Clause for walk-in freezers lacking an inside opening mechanism (referencing ANSI/UL 471). Install it before the door goes into service.
- Residential hinges are not load-rated for insulated commercial panels, don't self-close, and allow the door to sag out of gasket alignment. A door installed this way may look fine initially and fail within months.
- Skipping the seal test means starting with a leak already present. Run a light-gap or paper-pull check before operating — even a minor gasket gap causes condensation buildup, temperature drift, and higher energy consumption from day one.
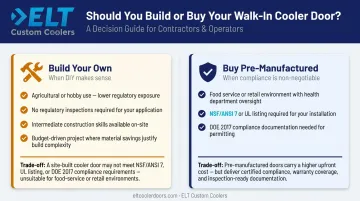
When to Build vs. Buy a Walk-In Cooler Door
Build your own when:
- The application is agricultural, hobby, or non-commercial
- Regulatory compliance and health inspections do not apply
- You have intermediate construction skills and access to commercial-grade components
- Budget constraints make material-cost savings meaningful
Buy a pre-manufactured certified door when:
- The cooler is in a restaurant, retail, food service, or warehouse environment subject to health department inspections
- NSF/ANSI 7 or UL listing is required — a field-built door will not carry these certifications automatically
- DOE 2017 compliance documentation is needed — factory doors come with certification records; a DIY build does not
If the "buy" column applies to your situation, ELT Custom Coolers manufactures prehung cooler and freezer doors with NSF-approved hardware, closed-cell insulation, magnetic gaskets, cam-lift hinges, safety release handles, and door closers as standard. Stainless steel is available as an upgrade, and custom sizes cover non-standard openings — often the deciding factor for operators who were considering a DIY build.
A DIY door may cost less in materials, but carries real risk: no insulation performance documentation, unverified hardware compatibility, and no listing certifications for health inspectors. A factory door costs more upfront but removes that compliance uncertainty and delivers predictable thermal performance.
Frequently Asked Questions
How thick is a walk-in cooler door?
Standard walk-in cooler doors are typically 4" thick using polyurethane foam insulation, which meets the DOE-required R-25 minimum depending on the foam's certified R-value. Freezer applications require at least R-32, which may necessitate 4–5" of insulation depending on the foam product used.
How do you measure a walk-in cooler door?
Measure the rough opening at three points for both width (top, middle, bottom) and height (left, center, right), and use the smallest measurement. The door panel is built or ordered slightly smaller than the rough opening — not equal to it — to account for the frame and gasket compression clearance.
What type of insulation is used in walk-in cooler doors?
The industry standard is foamed-in-place or rigid polyurethane foam, which delivers approximately R-6 to R-8+ per inch and absorbs minimal moisture. EPS (expanded polystyrene) is a lower-cost option but offers lower R-value per inch, making it harder to hit R-25 or R-32 targets within standard door thickness.
Do walk-in cooler doors require an interior safety release?
Yes. All enclosed commercial walk-in coolers must have an interior safety release handle that allows anyone inside to exit regardless of whether the door is latched from outside. OSHA has cited employers under the General Duty Clause for missing this mechanism, and UL 471 includes latch-release requirements for commercial refrigerator and freezer equipment.
What type of hinges do walk-in cooler doors use?
Commercial walk-in cooler doors use cam-lift (cam-rise) hinges — load-rated for insulated door panels, self-closing, and designed to lift the door during opening to reduce gasket drag and maintain alignment. Residential hinges are not suitable; they lack self-closing function and will cause the door to sag out of alignment over time.
Can I replace a walk-in cooler door instead of building one?
Replacing with a pre-manufactured door is often the more practical option, especially for commercial operators. Factory doors come pre-assembled with gaskets, hinges, hardware, and safety releases, and standard sizes ship from stock. Custom sizes can be ordered from manufacturers like ELT Custom Coolers for non-standard or heritage openings where standard catalog dimensions do not fit.