The good news: replacing a commercial refrigerator door is a manageable job. It's not simple, but with the right preparation and parts, most swaps take a few hours. This guide covers when to replace versus repair, what to gather beforehand, the full step-by-step process, and how to troubleshoot problems after installation.
Key Takeaways
- Shut down power at the breaker before starting; a thermostat adjustment won't cut it
- Measure the opening precisely; ordering the wrong door is the most common and costly delay
- Always use a second person for the lift, since walk-in doors can weigh 200 lbs or more
- Seat the gasket fully before testing; poorly set corners cause persistent air leaks
- Verify the seal with a paper test before restoring power
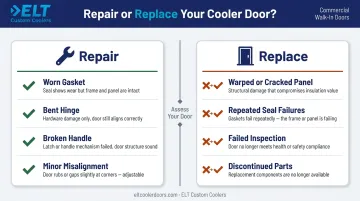
When Should You Replace vs. Repair a Commercial Refrigerator Door?
Not every door problem justifies a full replacement. Component-level repairs are often faster, cheaper, and less disruptive — but they only make sense when the door itself is structurally sound.
Repair Is the Right Call When:
- Gasket is worn or torn — gaskets are sold separately and replace in under 30 minutes when the door panel is intact
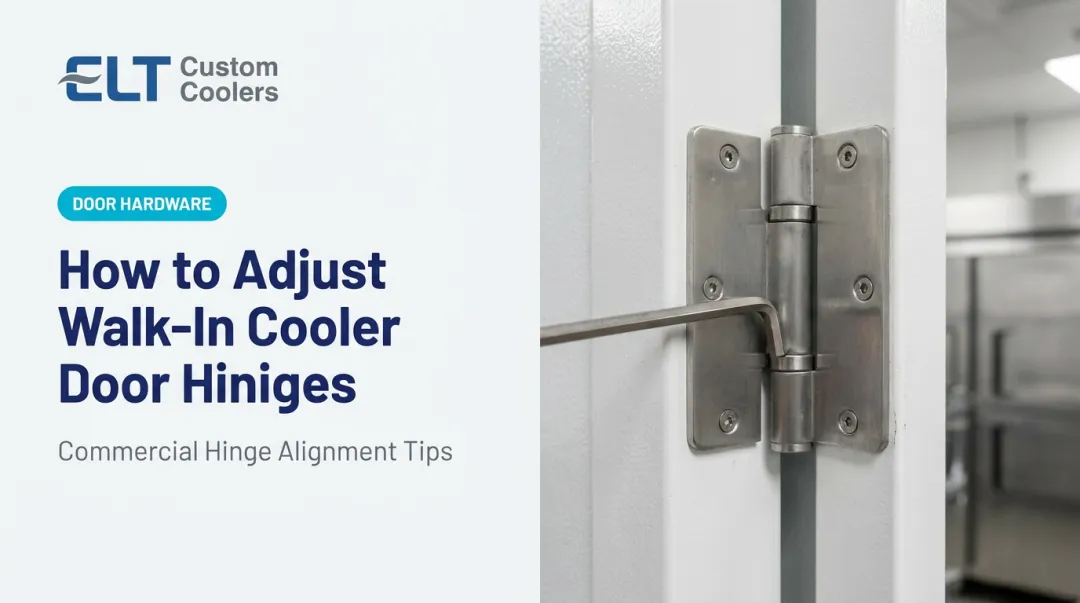
- Hinge is bent or stripped — a single damaged hinge can be swapped without removing the door
- Handle is broken — handle hardware is a 15-minute fix on most walk-in door models
- Door is slightly misaligned — usually traced to loose hinge bolts; tighten and realign with a level and wrench
Full Door Replacement Is Warranted When:
- The door panel is visibly warped, cracked, or structurally damaged — no amount of gasket work fixes a bent panel
- The door repeatedly fails to seal despite multiple gasket replacements, suggesting the frame or panel geometry is off
- The unit is going through a health department inspection and the existing door no longer meets current compliance standards
- The door model is discontinued and individual replacement parts are no longer available
According to U.S. Cooler, visible light leaking through the door opening, sweating between door and jamb, and ice buildup on freezer doors are all signs the door system is failing — start with the gasket, but if problems persist after replacement, the door panel or frame needs to be replaced.
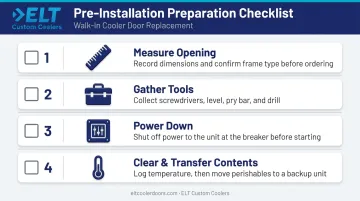
What You Need Before Replacing a Commercial Refrigerator Door
Preparation is where most replacements succeed or fail. An unprepared swap leads to incorrect parts, extended downtime, and installation errors that are frustrating to diagnose.
Equipment and Door Specifications
Before ordering anything, get these measurements and details confirmed:
- Opening dimensions: measure height and width of the door opening, not the old door panel
- Rough opening size: plug frame doors need a smaller rough opening than jamb frame doors — a 36"×78" plug frame door requires a 33.5"×78" rough opening
- Hinge orientation: left or right swing, determined standing outside looking in
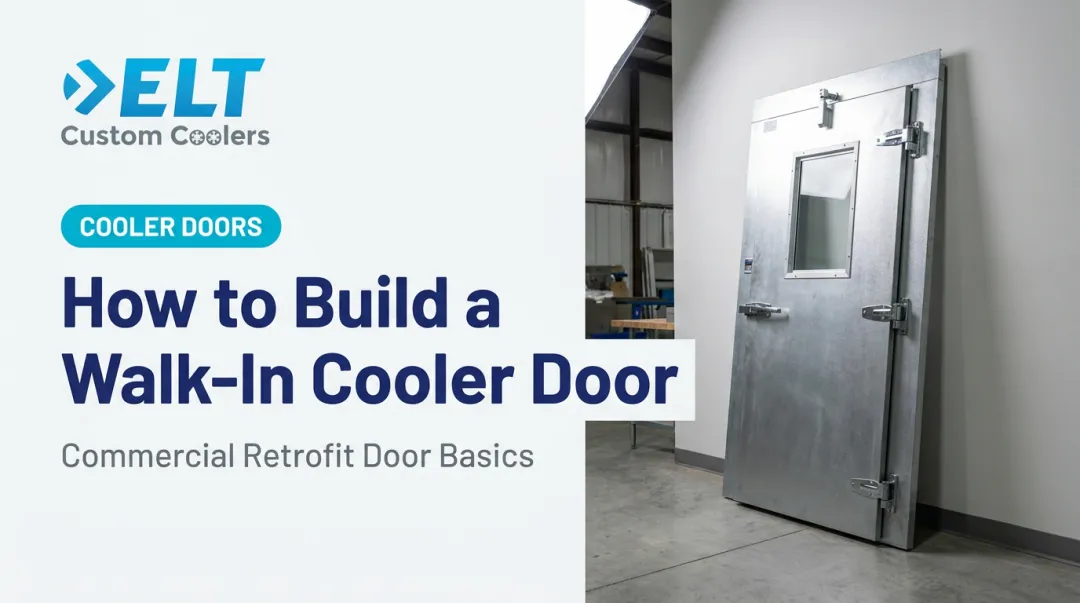
- Door type: swing vs. slide, solid vs. glass, cooler vs. freezer rating
- Frame type: standard jamb, plug/retrofit, or heated (freezer applications require heated frames to prevent ice buildup at the jamb)
Freezer doors specifically need heated-jamb frames. Without the anti-condensate heating element embedded in the frame, ice builds up at the perimeter seal, the gasket freezes to the frame, and the door becomes difficult or impossible to open.
Replacement doors must meet your jurisdiction's certification requirements. Depending on your health department, these may include NSF/ANSI 7 (commercial refrigerator and freezer sanitation standard), UL Certification, or DOE 2017 energy compliance per 10 CFR Part 431, which sets insulation minimums (R-25 for coolers, R-32 for freezers) and requires automatic door closers.
ELT Custom Coolers stocks UL Certified, NSF-approved, DOE 2017 Compliant prehung replacement doors in standard cooler sizes (30"–60" wide, 78"–130" tall) and freezer sizes (30"–60" wide, 76"–84" tall), including heated-jamb freezer configurations. Custom manufacturing is available for non-standard openings.
Tools and Materials
Gather these before you start:
- Flathead and Phillips screwdrivers
- Hex/Allen key set
- Putty knife or gasket removal tool
- Spirit level
- Drill
- Replacement door (with gasket included or separate)
- Hinge hardware (if not pre-installed on the new door)
- A second person
Operational Readiness
- Power down at the breaker, not just the thermostat
- Transfer all perishables to temperature-controlled backup storage
- Log the internal temperature before shutdown for food safety documentation
- Allow the door frame area to reach ambient temperature — cold surfaces cause condensation that interferes with installation
How to Replace a Commercial Refrigerator Door (Step-by-Step)
Step 1: Power Down and Prepare the Unit
Shut off power at the breaker. Active compressor cycling during installation creates pressure differentials and safety risks you don't need.
Remove all contents from the compartment and place them in insulated or refrigerated storage. Check for ice buildup, debris, or damaged weather stripping around the door frame and clear everything before the new door goes in. Skipping this step creates problems that are tedious to diagnose after installation.
Step 2: Remove the Old Door
- Remove the door handle (typically 2–4 screws)
- Unscrew hinge covers to expose the hinge pins or mounting bolts
- Remove bottom hinge first, then top with a second person supporting the door's weight throughout to prevent it from falling and damaging the frame
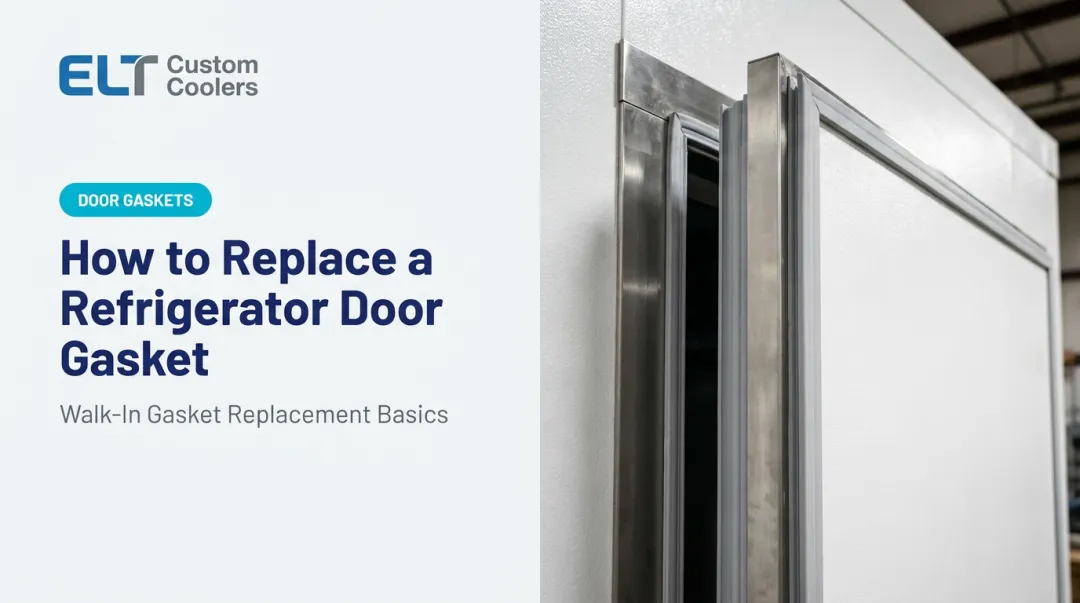
- Pull the gasket free from its channel using a putty knife
- Inspect the gasket channel for cracks, corrosion, or residue and clean thoroughly before installing the new door
Don't skip the channel inspection. Debris or rust left in the channel will prevent the new gasket from seating properly, and you'll chase air leaks for hours trying to figure out why the seal isn't holding.
Step 3: Install the New Door
Attach the top hinge first while your second person supports the door's full weight. Align the hinge plate holes before tightening. Even a few millimeters off will result in a crooked hang that's difficult to correct once the bottom hinge is set.
Once the top hinge is seated, secure the bottom hinge, then reinstall the handle. Use a spirit level to verify the door is plumb both vertically and horizontally before final tightening.
If the replacement door comes with a separate gasket, press it firmly and evenly into the channel starting at the corners. Corners are where gaskets fail to seat most often. A gasket that isn't fully seated will leak regardless of how well the door hangs, so work each corner deliberately before moving to the straight runs.
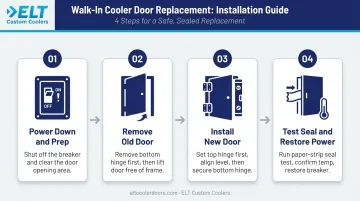
Step 4: Test the Seal and Restore Power
Perform the paper test: close the door on a sheet of paper and pull. You should feel consistent resistance around the entire perimeter. If the paper slides out freely anywhere, the gasket isn't sealing at that point.
Once the seal passes, restore power and confirm the unit is operating correctly:
- Internal temperature returns to target range within 30–60 minutes
- No unusual compressor cycling after startup
- No frost forming around the door frame
Document the replacement for maintenance records and any future warranty claims: door model, installation date, and any adjustments made.
Common Mistakes When Replacing a Commercial Refrigerator Door
Three mistakes cause the majority of failed installations:
Ordering the wrong door is the single most common source of delays. Always verify height, width, hinge orientation, and frame type against the unit's spec sheet before ordering. Plug frame and jamb frame openings have different rough opening requirements — a door sized for one won't fit the other.
Skipping proper gasket seating leads to persistent cold air leaks. Air infiltration can account for over 50% of a walk-in's cooling load — meaning even a small gap drives up energy costs and strains the compressor. Press every inch into place, corners especially.
Attempting a solo installation on a walk-in door is a serious risk. Replacement doors weigh 200 lbs or more; a one-person lift risks dropping the door, stripping hinge holes, and injury. Always bring a second person.
Troubleshooting Issues After Replacing a Commercial Refrigerator Door
Problems after installation are common and almost always fixable without starting over. Most trace back to alignment or gasket seating.
Door Doesn't Close or Latch Properly
The most common cause is hinges that aren't fully tightened, leaving the door hanging slightly off-level. Loosen the hinge bolts, re-level with a spirit level, and re-tighten. Also check the strike plate or magnetic latch alignment. Even a well-hung door won't latch if the strike is off.
Cold Air Leaking Despite New Gasket
The gasket likely isn't fully seated in the channel, or shipping folds left memory creases that break contact with the door frame. Re-press the gasket around the entire perimeter. For creased sections, apply low heat from a heat gun to restore flexibility, then re-seat. Pay extra attention to corners — they're the most common leak point.
Unit Running Continuously After Door Replacement
The refrigeration system may still be recovering from the temperature rise during installation, or a minor air infiltration point is forcing it to work harder. Allow 1–2 hours for temperature recovery before drawing conclusions. If continuous running persists, redo the paper test around the full door perimeter. Focus on the hinge-side seal. That area is most prone to gaps caused by hinge alignment issues.
Frequently Asked Questions
How much does a commercial refrigerator door cost?
Walk-in cooler replacement doors typically run $1,450–$3,500 for standard swing configurations in common sizes. Walk-in freezer doors with heated frames generally start higher, around $1,650–$3,700 depending on size. Oversized, sliding, or custom doors can reach $6,500–$15,000+. Glass display doors and electric sliding systems sit at the higher end of that range.
Can you buy just a refrigerator door?
Yes — replacement doors are sold separately by manufacturers and specialty suppliers. ELT Custom Coolers, for example, stocks prehung walk-in cooler and freezer replacement doors in over 60 standard sizes. Match the replacement exactly to your unit's opening dimensions, frame type, and hinge orientation before ordering.
What is the difference between a commercial refrigerator and a regular refrigerator?
Commercial units are built for high-frequency access, larger storage volumes, and heavier-duty components designed for constant cycling. They must meet food safety standards like NSF/ANSI 7 and DOE energy requirements — ratings residential refrigerators don't carry and can't legally substitute for in commercial foodservice.
How do I know if my commercial refrigerator door needs to be replaced?
Watch for persistent temperature fluctuations with a functional compressor, a warped or cracked door panel, recurring gasket failures, or frost buildup around the frame that returns after maintenance. When repairs stop holding, a full door replacement is the more cost-effective path.
How long does it take to replace a commercial refrigerator door?
A straightforward swing door swap with the correct replacement and two people typically takes 1–3 hours. Walk-in sliding door systems, units with corroded hardware, or installations requiring frame work can take longer; plan for a half-day if complications are possible.
Can I replace just the gasket instead of the entire door?
Yes, and it's often the right call. If the door panel is structurally sound, a gasket-only replacement is faster and far less expensive than a full door swap. Gaskets are sold by size and door model; proper seating in the channel is critical to their performance.