DIY attempts without adequate refrigeration knowledge carry real risks — thermal bridging, refrigerant mishandling, failed health inspections, and expensive rework are common outcomes.
This guide covers the complete build process: from site planning and materials selection through panel assembly, refrigeration integration, and commissioning. Whether you're managing the build yourself or overseeing a contractor, understanding each phase helps you catch problems before they become costly.
Key Takeaways
- Determine room size, target temperature, insulation R-value, and refrigeration system before purchasing a single panel
- Build sequence: site prep → floor panels → wall/ceiling panels → door installation → refrigeration → sealing → commissioning
- DOE 2017 standards set R-25 minimum for coolers and R-32 minimum for freezers — always specify R-value, not panel thickness alone
- Refrigeration sizing depends on room volume, insulation R-value, product load, and door opening frequency
- Refrigerant work legally requires a certified EPA 608 technician — this is not optional
Before You Build: Planning, Prerequisites, and What You Need
Most cold room failures trace back to planning decisions, not construction errors. Get the site prerequisites wrong and you're correcting them after concrete is poured and panels are installed — at significant cost.
Site Prerequisites
Confirm these before ordering a single component:
- Floor: Level concrete slab capable of bearing refrigeration equipment and full product load. Floor panel ratings vary significantly — U.S. Cooler publishes ratings from 600 psf (standard prefab floor) to 5,000 psf (Titan floor) depending on construction type. Match your panel system to your point loads.
- Electrical supply: Voltage, phase, and amperage requirements depend entirely on the selected refrigeration equipment — not room size. Size your refrigeration load first, then determine electrical service requirements from the equipment nameplate.
- Drainage: IPC 802.1.2 requires food-service walk-in floor drains to discharge indirectly through an air gap. In freezing areas, waste lines must discharge to a receptor outside the freezing zone. Coordinate drainage with your plumber before the slab is poured.
- Condenser clearance: The condensing unit needs adequate ventilation and clearance for heat dissipation. Check manufacturer specifications for minimum clearances before finalizing placement.
- Permits: Most commercial cold room builds require building permits, electrical permits, and health department approval — especially for food service. Confirm with your local authority having jurisdiction (AHJ) before starting.
Temperature Range Planning
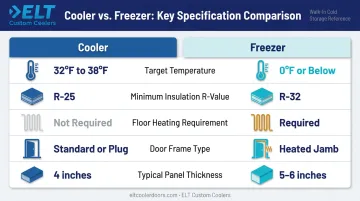
Cooler and freezer builds differ in insulation requirements, door specs, and floor treatment. The table below shows the key distinctions — getting these wrong at the design stage is expensive to correct later.
| Parameter | Cooler | Freezer |
|---|---|---|
| Target temp | 35°F–41°F (2°C–5°C) | 0°F or below |
| Minimum insulation | R-25 (DOE 2017) | R-32 (DOE 2017) |
| Floor heating | Not required | Required (frost heave prevention) |
| Door frame | Standard | Heated jamb |
| Typical panel thickness | 80mm PIR/PUR | 100mm+ PIR/PUR |
The FDA Food Code 2022 sets 41°F (5°C) or below for cold-held TCS food — but this is a model code, and your state or local health authority may have adopted a different edition or amendment. Verify the adopted standard before finalizing your design temperature.
Materials and Components Required
| Component | Selection Notes |
|---|---|
| Insulated sandwich panels (walls, ceiling, floor) | PIR or polyurethane core; specify R-value, not just thickness |
| Commercial cold room door | Thermal break and compression gasket required; heated jamb for freezers |
| Refrigeration system | Must be sized by load calculation — not room volume alone |
| Panel connectors | Cam-lock or eccentric-lock; order from same manufacturer as panels |
| Cold-room-rated sealant | Must be rated for the target temperature |
| Floor coating or membrane | Anti-slip for coolers; floor heating cables for freezers |
For commercial food service applications, doors and hardware should carry NSF approval. ELT Custom Coolers' prehung walk-in cooler and freezer doors ship with chrome NSF-approved hardware, magnetic gaskets, and double-sweep door sweeps included — no separate hardware sourcing required.
How to Build a Custom Cold Room: Step-by-Step
Skipping or rushing any phase — particularly sealing and refrigeration integration — typically results in temperature inconsistency, moisture infiltration, or system failure that becomes expensive to diagnose once the room is operational. The sequence below is the sequence for a reason.
Step 1 — Site and Floor Preparation
- Ensure the subfloor is level, clean, and dry before any panels are placed
- For coolers: a standard concrete slab with anti-slip coating is the typical approach
- For freezers: floor heating cables must be installed in the slab before floor panels are laid — these prevent frost heave, a condition where subfreezing temperatures freeze moisture below the slab and cause it to buckle
- Apply a vapor barrier around the perimeter if building inside an existing structure
- Confirm drainage rough-in is complete and pitched correctly (minimum ¼ inch per foot per Heatcraft specification)
Step 2 — Floor Panel Installation
Start from one corner and work outward. Engage cam-lock connectors between each panel, checking for level continuously. Seal all joints with cold-room-rated sealant — gaps in the floor panel joints are a primary entry point for moisture.
One common decision point: some cooler applications skip insulated floor panels to allow pallet jack access. This reduces thermal performance and typically requires upsizing the refrigeration system by 15–20%. Factor this tradeoff into your planning before the floor goes down — not after.
Step 3 — Wall and Ceiling Panel Assembly
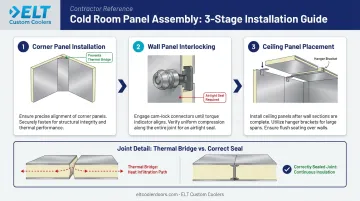
Erect wall panels beginning at a corner, interlocking each panel using the manufacturer's locking mechanism. Corner panels are non-negotiable at all 90-degree junctions — skipping them creates thermal bridges.
A thermal bridge forms when metal panel skins make unbroken contact across a corner joint, creating a conductive heat path. The result: condensation on the exterior, frost streaks, mold risk, and measurable energy loss. Tight foam-to-foam contact and airtight sealant at every joint are the primary defenses.
Ceiling panels go in last. For larger spans, hangers or support brackets may be required — confirm with your panel manufacturer before assembly.
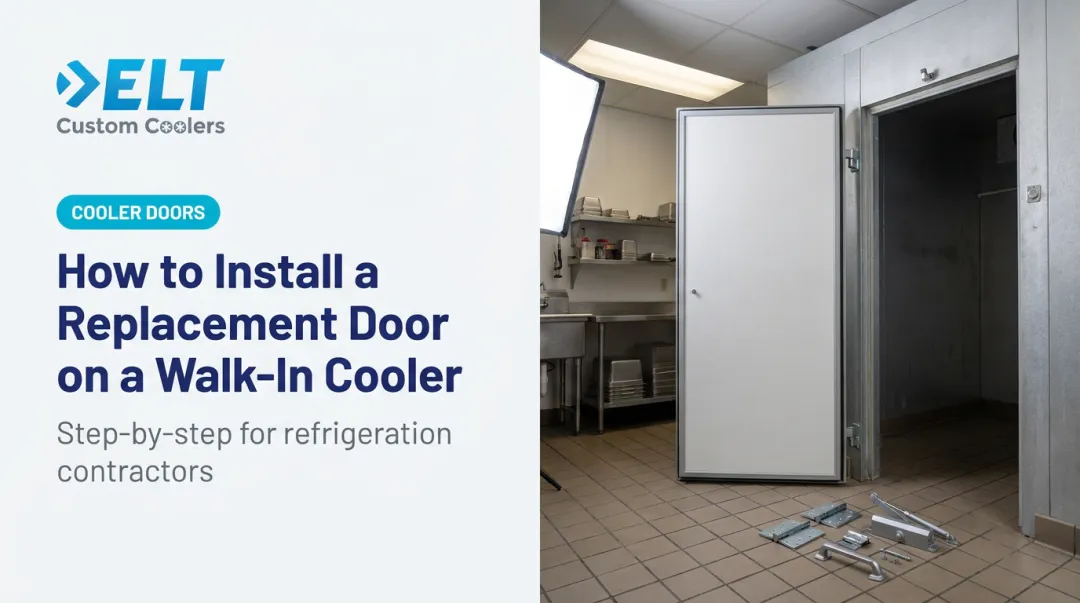
Step 4 — Door Frame and Door Installation
The door frame is installed as part of the wall panel sequence using manufacturer-supplied jamb sections. Once framed:
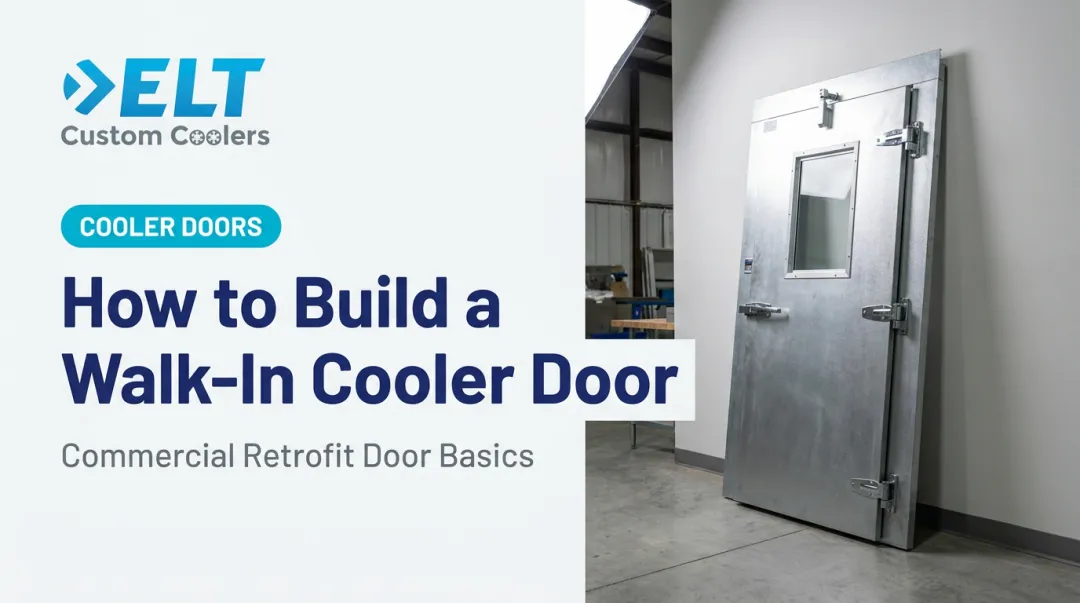
- Install the cold room door with its full thermal break and compression gasket
- Verify the door swings or slides freely and latches securely
- Confirm the inside safety release is functional — this is a code requirement, not optional
- For freezer doors, confirm the heated jamb is wired and operational
ELT Custom Coolers stocks prehung swing doors from 30" to 60" wide and sliding doors up to 12'x12', all supplied with frames. Freezer door configurations include heated jamb sandwich frames as standard, with replaceable anti-condensate heat wire — essential for sub-zero applications where gasket freezing is a genuine operational risk.
Give door installation the same attention as any panel joint — it is one of the leading sources of temperature loss when done poorly.
Step 5 — Refrigeration System Installation
- Mount the evaporator coil inside the room, ceiling-mounted and positioned per manufacturer clearance requirements — never directly over the door, and not obstructed by product stacking
- Position the condensing unit or monoblock according to ventilation requirements
- For split systems, connect and insulate refrigerant lines where they pass through panels
- Electrical connections require a licensed electrician
Refrigerant charging, leak testing, and evacuation must be performed by a certified EPA 608 technician. Under 40 CFR Part 82 Subpart F, anyone expected to violate a covered appliance's refrigerant-circuit integrity must be certified. Type II covers medium-, high-, and very-high-pressure appliances — which covers most commercial refrigeration systems. This is a federal requirement, not a suggestion.
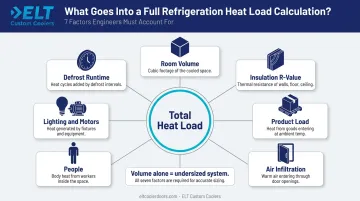
Refrigeration sizing must be based on a full heat load calculation — room volume alone is insufficient. Heatcraft's load calculation methodology includes envelope transmission, air infiltration, product load, people, lighting, motors, and defrost runtime. Systems selected on volume alone are almost always undersized.
Step 6 — Final Sealing and Trim
- Apply cold-room-rated sealant to all remaining panel joints, refrigerant line penetrations, and electrical penetrations
- Install trim or angle profiles at all internal corners
- Confirm every cam-lock is fully engaged — walk the full perimeter
- Check that no gaps exist where panels meet the floor cove
Post-Build Checks and Commissioning
Skipping formal commissioning is the most common cause of delayed failures. Systems that appear to run fine can hide door seal deficiencies, refrigerant undercharge, or insulation voids that only surface under load, and all of these are significantly more expensive to fix once product is stored inside.
Visual and Structural Checks
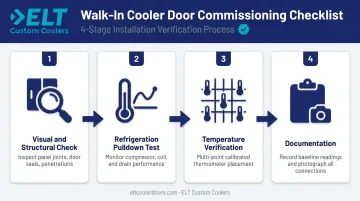
- Walk the entire perimeter checking for visible gaps in panel joints, door seals, and refrigerant line penetrations
- Confirm all cam-locks or eccentric locks are fully engaged
- Verify the door gasket makes complete perimeter contact when closed — a flashlight placed inside with the door closed can reveal light leakage at the seal
Functional Refrigeration Testing
- Power on the refrigeration system and allow it to pull down to the target temperature
- Monitor for excessive compressor cycling, unusual noise, or icing on the evaporator coil beyond the normal defrost cycle
- Verify drain flow and confirm defrost operation is operating correctly
Temperature Monitoring and Documentation
FDA Food Code 4-204.112 requires a temperature-measuring device in mechanically refrigerated food storage, positioned to measure the warmest part of the unit, with accuracy of ±3°F (±1.5°C). Before signing off on the build, complete these documentation steps:
- Place calibrated thermometers at multiple heights and corners to verify uniform distribution
- Install a temperature monitoring system with remote alerts — required for most commercial food storage and pharmaceutical applications
- Document baseline pulldown readings for health department inspection records
- Photograph all panel joints, refrigerant connections, and electrical penetrations before they are concealed
Common Cold Room Build Problems and How to Fix Them
Even well-planned builds encounter issues. Catching them during or immediately after installation prevents long-term performance and compliance problems.
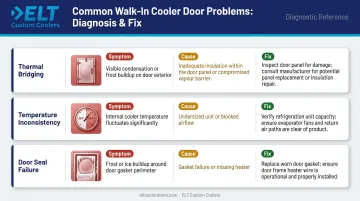
Thermal Bridging at Panel Joints
Symptom: Condensation or frost streaks forming at panel corners or exterior joint lines.
Cause: Metal panel skins making unbroken contact across a corner joint, creating a conductive heat path, typically from skipping proper corner panels or using inadequate joint details.
Fix: At corner joints, a controlled slit or cut in the inner metal skin layer breaks the thermal bridge. For existing installations, apply the panel manufacturer's engineered repair detail: closed-cell foam sealant and thermal-break tape can address minor gaps, but always follow the manufacturer's specified repair method. Monitor for recurrence.
Temperature Inconsistency and Hot Spots
Symptom: Measured temperatures vary significantly across the room, with some zones consistently warmer than target.
Cause: Undersized refrigeration unit for the actual room volume and load, or poor airflow from evaporator placement or shelving blocking air circulation.
Fix: Verify the system was sized using a proper heat load calculation with actual inputs: room volume, insulation R-value, product load, door opening frequency, and ambient temperature.
Then check the airflow path:
- Reposition shelving to keep clear space around the evaporator
- Confirm the evaporator fan is drawing air across the full room footprint
- If the unit is genuinely undersized, you may need to add a supplemental evaporator or upgrade the system
Door Seal Failure and Air Infiltration
Symptom: Excessive frost around the door frame, slow temperature recovery after door openings, or visible condensation on the door exterior.
Cause: Door gasket not making full perimeter contact (warped, damaged, or incorrectly installed), door not self-closing fully, or missing door frame heater on freezer doors.
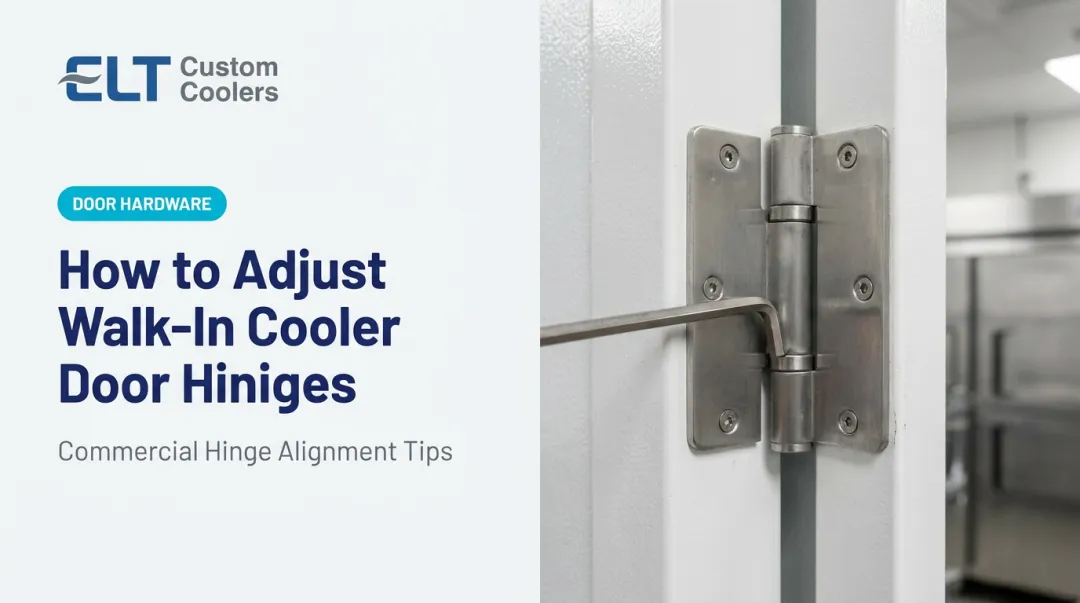
Fix: Inspect and replace the gasket if it fails a seal test. Verify the door closer is tensioned correctly: DOE regulations require automatic closers that firmly close within 1 inch of full closure.
For freezers, confirm the heated jamb is installed and operational. A non-functioning frame heater on a sub-zero freezer door causes the gasket to freeze to the frame, breaking the seal and damaging it over repeated cycles.
Frequently Asked Questions
How much does a cold room installation cost?
Costs vary widely based on room size, insulation type, target temperature, and whether you're using a prefab kit or a fully custom build. Request itemized quotes covering panels, refrigeration equipment, electrical, installation labor, drainage, and compliance costs separately — bundled quotes obscure where the real cost differences are.
Can I build a cold room inside an existing room or building?
Yes. Existing structures can be retrofitted using insulated sandwich panels on walls, ceiling, and floor. Before panels go in, confirm the space meets commercial standards for structural load, moisture control, electrical capacity, and drainage access.
What insulation thickness do I need for a custom cold room?
DOE 2017 standards require a minimum of R-25 for coolers and R-32 for freezers. Typical commercial cooler panels run 80mm PIR or polyurethane; freezer rooms generally require 100mm or more. Always specify by R-value, not thickness alone — performance varies across core materials and operating temperatures.
Do I need a permit to build a cold room?
Most commercial cold room builds require building permits, electrical permits, and health department approval — particularly for food service applications. Requirements vary by state and locality. Check with your local AHJ before starting any construction.
What refrigeration system is best for a custom cold room?
Self-contained (monoblock) systems are easier to install and suited to smaller rooms. Split systems with remote condensers work better for larger or high-capacity applications and generate less noise inside the cold room. Base your selection on a full heat load calculation — not room volume or square footage alone.
How long does it take to build a custom cold room?
A small modular prefab kit can be assembled in 1–3 days by an experienced team. A fully custom cold room with site preparation, panel construction, refrigeration commissioning, and permitting typically takes 1–3 weeks depending on size, site conditions, and equipment lead times.